OpenCV Module 8 : Căn chỉnh góc cho hình ảnh
MVT
Đang cập nhật
Căn chỉnh hình ảnh với mẫu có sẵn

Mô tả
- Chúng ta sẽ sử dụng phương thức Homography để chuyển bất kỳ góc cạnh nào của một hình ảnh trở nên đúng với góc của hình ảnh ban đầu.

- Hình ảnh của hai mặt phẳng có liên quan phải có cùng Homography
- Chúng ta cần 4 điểm tương ứng để ước tính Homography

Các bước xử lý
Bước 1: Import các thư viện có liên quan
import numpy as np import cv2 import matplotlib.pyplot as plt
Bước 2 : Đọc hình ảnh nền và hình ảnh được scanned
# Trong opencv, tất cả các hình ảnh được đọc dưới dạng mạng BGR ["Blue", "Green", "Red"] thay vì RGB img1 = cv2.imread("openCV_DATA/08_Image_Fetaures_and_Alignment/form.jpg") img2 = cv2.imread("openCV_DATA/08_Image_Fetaures_and_Alignment/scanned-form.jpg") # Chuyển ảnh màu thành RGB img1 = img1[:,:,::-1] img2 = img2[:,:,::-1]
# Vẽ 2 hình plt.figure(figsize=(20,10)) plt.subplot(121);plt.imshow(img1);plt.axis(False) plt.subplot(122);plt.imshow(img2);plt.axis(False)

Bước 3: Tìm các điểm keypoints của 2 hình
Hãy coi các điểm chính là các điểm góc ổn định trong các phép biến đổi hình ảnh
# Chuyển màu ảnh thành GRAYSCALE img1_gray = cv2.cvtColor(img1, cv2.COLOR_RGB2GRAY) img2_gray = cv2.cvtColor(img2, cv2.COLOR_RGB2GRAY) # Tạo ORB features để phát hiện và tính toán mô tả ảnh. MAX_NUM_FEATURES = 300 orb = cv2.ORB_create(MAX_NUM_FEATURES) kp1, des1 = orb.detectAndCompute(img1_gray, mask=None) kp2, des2 = orb.detectAndCompute(img2_gray, mask=None) # kết hợp hình ảnh với các điểm keypoints vừa tìm được img1_kp1 = cv2.drawKeypoints(img1, kp1, outImage=np.array([]), color=(0,255,0), flags=cv2.DRAW_MATCHES_FLAGS_DRAW_RICH_KEYPOINTS) img2_kp2 = cv2.drawKeypoints(img2, kp2, outImage=np.array([]), color=(0,255,0), flags=cv2.DRAW_MATCHES_FLAGS_DRAW_RICH_KEYPOINTS)
# Hiển thị ảnh fig = plt.figure(figsize=(20,10)) plt.subplot(121);plt.imshow(img1_kp1);plt.axis(False);plt.title("Original Image"); plt.subplot(122);plt.imshow(img2_kp2);plt.axis(False);plt.title("Scanned Image"); fig.savefig("image_owth_keypoints.jpg")

Bước 4 : Tìm các keypoints trùng nhau trong 2 ảnh
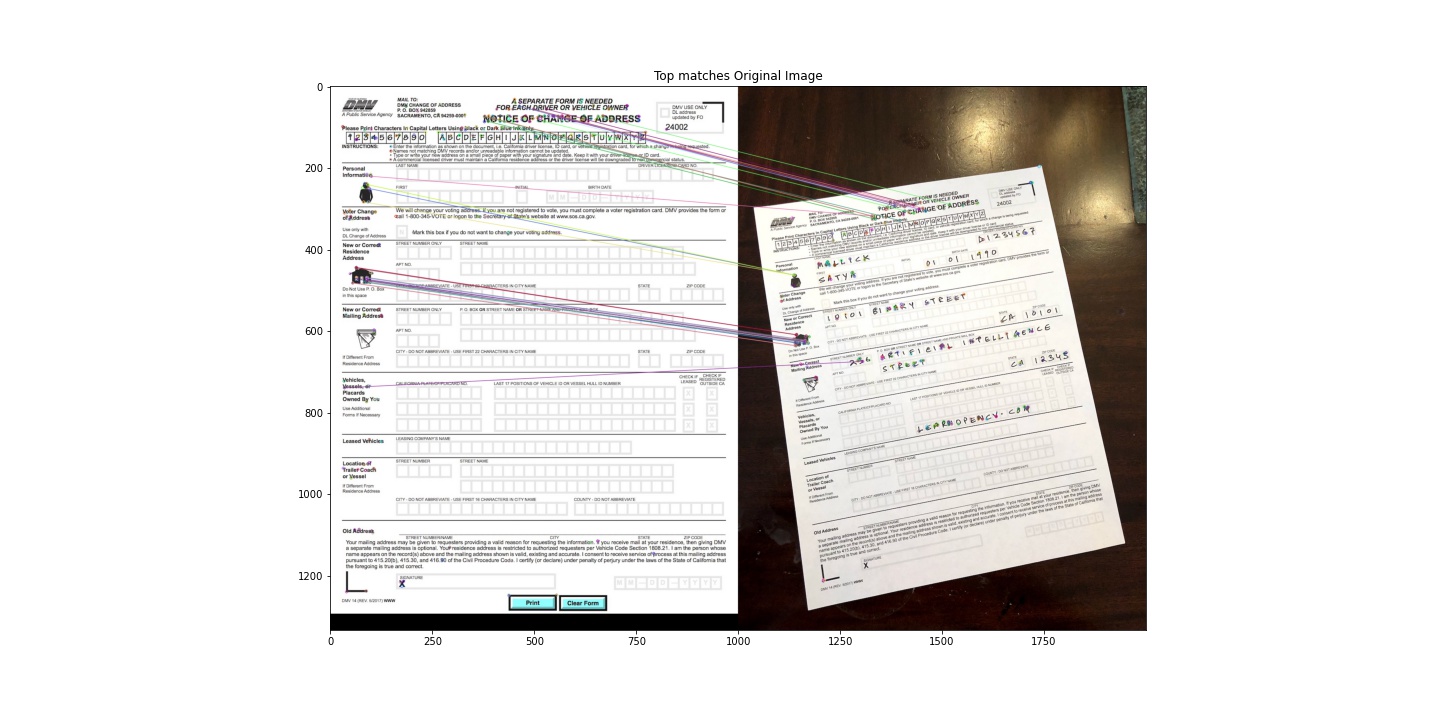
Ở đây, chúng ta sẽ sử dụng thuật toán Brute-Force Matcher để tính toán các khoảng cách.
matcher = cv2.DescriptorMatcher_create(cv2.DESCRIPTOR_MATCHER_BRUTEFORCE_HAMMING) matches = matcher.match(des1,des2) # Sắp xếp các matches theo khoảng cách giữa các điểm của 2 ảnh matches.sort(key=lambda x : x.distance) # Sau khi tính toán xong, ta chỉ lấy 10% features nào là tốt nhất ( tương ứng khoảng cách gần nhất) good = matches[:int(len(matches)*0.1)]
# HIển thị các điểm phù hợp nhất của 2 ảnh fig = plt.figure(figsize=(40,10)) plt.imshow(draw_top_matches);plt.title("Top matches Original Image")

Bước 5 : Tìm Hormography
# extract location of good matches pts1 = np.zeros((len(matches), 2), np.float32) # representative (x,y) with len of matches pts2 = np.zeros((len(matches), 2), np.float32) # representative (x,y) with len of matches for i, match in enumerate(matches) : pts1[i,:] = kp1[match.queryIdx].pt pts2[i,:] = kp2[match.trainIdx].pt retval, mask = cv2.findHomography(pts2,pts1,cv2.RANSAC)
Bước 6 : Warp image
# Use homography to warp image height,width,channels = img1.shape img2_reg = cv2.warpPerspective(img2,retval,dsize=(width, height)) plt.figure(figsize=(20,10)) plt.subplot(121);plt.imshow(img1);plt.title("Original Image") plt.subplot(122);plt.imshow(img2_reg);plt.title("Alignment Image")